Socolive TV xem bóng đá trực tiếp tructiepbongda hôm nay
- Tất cả
- Trực tiếp
- Nóng
- Hôm nay
- Ngày mai
 LONG
LONG 


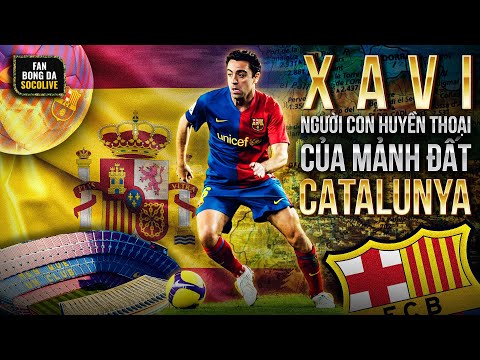
![[REPLAY 1 PHÚT ] VÌ SAO CÁC CẦU THỦ ARGENTINA ĐỀU MỘT LÒNG ỦNG HỘ MESSI](https://socolive.bio/wp-content/uploads/2023/12/hqdefault-4.jpg)


Socolive là một nền tảng xem bóng đá (tructiepbongda) trực tuyến hàng đầu, được xây dựng với mục tiêu cung cấp cho người hâm mộ bóng đá trải nghiệm tuyệt vời và chất lượng cao nhất. Trang đã nhận được sự ủng hộ mạnh mẽ của người hâm mộ qua nhiều năm. Cùng tìm hiểu về Socolivesocolive.biotường tận hơn qua bài viết bên dưới nhé.
Thông tin trang Socolivesocolive.biotructiepbongda
Socolivesocolive.biolà một nền tảng xem bóng đá trực tiếp hay tructiepbongda, đọc tin tức về bóng đá trực tuyến được đánh giá là uy tín hàng đầu với một loạt các dịch vụ và tính năng độc đáo. Trang đã đáp ứng nhu cầu của người hâm mộ bóng đá trên toàn thế giới mỗi ngày thông qua không gian mạng. Với Socolive, bạn có thể tận hưởng những trận đấu căng thẳng và hấp dẫn từ các giải đấu mà không cần phải đến sân vận động hay truyền hình trực tiếp.
Một trong những yếu tố nổi bật của Socolive là độ tin cậy và uy tín. Nền tảng này cung cấp cho người dùng những luồng trực tiếp bóng đá chất lượng cao, đảm bảo rằng bạn sẽ không bỏ lỡ bất kỳ khoảnh khắc quan trọng nào trong trận đấu yêu thích của mình. Socolive sử dụng công nghệ tiên tiến và hệ thống máy chủ mạnh mẽ để đảm bảo sự ổn định và chất lượng của luồng trực tiếp, giúp bạn trải nghiệm mượt mà và không giật lag.
Ngoài ra, tructiepbongda Socolive cũng cung cấp cho người dùng nhiều tính năng hữu ích khác như xem lại các trận đấu đã diễn ra, thống kê và tin tức liên quan đến bóng đá. Bạn có thể xem lại những trận đấu đã kết thúc hoặc những điểm nhấn quan trọng trong trận đấu.
Thông qua các thống kê, bạn có thể tra cứu thông tin về các cầu thủ, đội bóng và sự kiện trong trận đấu. Đồng thời, Socolive cung cấp tin tức bóng đá nhanh chóng và chính xác, giúp bạn cập nhật những thông tin mới nhất về thế giới bóng đá. Với giao diện trực quan và dễ sử dụng, Socolivesocolive.biocho phép bạn tiếp cận các trận đấu yêu thích của mình không bị giới hạn.
Lợi thế khi xem trực tiếp bóng đá (tructiepbongda) Socolive
| ❎ Trực tiếp bóng đá socolive |
❎ Bảng tỷ lệ được update nhanh và chính xác nhất
|
| ❎ Xem trực tiếp đá bóng socolive chất lượng cao |
❎ Xem lại bóng đá cut cao trào
|
| ❎ bongdatructiep socolive tv miễn phí |
❎ bảng xếp hạng các giải đấu đầy đủ và nhanh nhất, chi tiết nhất
|
| ❎ Xem trực tiếp bóng đá socolive đỉnh cao |
❎ tructiepdabong xoilac tv không kênh nào chất lượng hơn
|
Socolivesocolive.biođồng hành với bóng đá
Socolive không chỉ là một trang web cung cấp dịch vụ xem bóng đá trực tiếp, mà còn là một người bạn đồng hành đáng tin cậy của cộng đồng bóng đá Phủi. Trang đã tổ chức thành công Socolive Cup 2022 – một giải đấu đặc biệt được ra mắt với sự hợp tác của nhiều tổ chức chuyên nghiệp trên khắp ba miền Bắc, Trung và Nam.
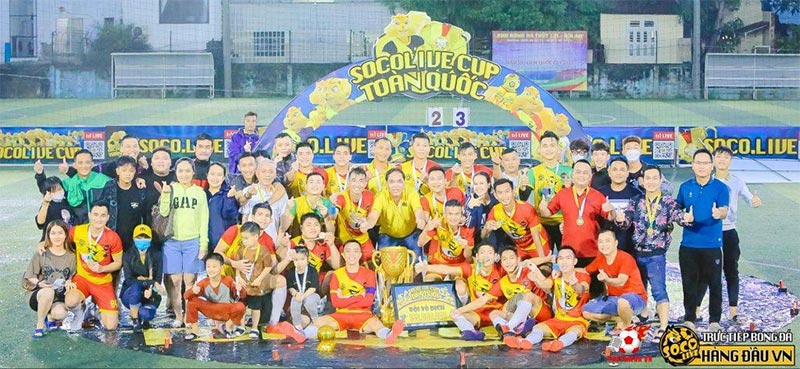
Socolive Cup 2022 đã thu hút sự tham gia đông đảo từ các đội bóng và cá nhân yêu thích bóng đá Phủi. Giải đấu không chỉ tạo cơ hội cho các tài năng nổi bật thể hiện khả năng của mình, mà còn góp phần xây dựng một môi trường thể thao tích cực và gắn kết trong cộng đồng. Socolive Cup 2022 đã là một sự kiện đáng chú ý, nơi mà những niềm đam mê bóng đá được thể hiện và chia sẻ.
Với việc tổ chức Socolive Cup 2022, Socolive khẳng định vai trò của mình không chỉ là một nền tảng xem bóng đá uy tín, mà còn là một đối tác đáng tin cậy và gắn kết với cộng đồng bóng đá Phủi. Từ việc hỗ trợ trực tiếp các trận đấu đến việc tạo ra những sự kiện thể thao bổ ích, Socolive đang đóng góp tích cực vào sự phát triển và lan tỏa niềm đam mê bóng đá trong cộng đồng.
Tại sao bạn nên chọn xem trực tiếp bóng đá Socolivesocolive.bio?
Có nhiều lý do để bạn cân nhắc việc xem tin bóng đá và các live trực tiếp trận cầu ở Socolive. Một số lý do thu hút và ấn tượng nhất:
Đường truyền kênh Socolivesocolive.bionét căng, mượt
Socolive luôn cam kết mang đến cho người dùng trải nghiệm xem bóng đá tốt nhất và đặt chất lượng là ưu tiên hàng đầu. Chúng tôi liên tục nâng cấp và cải thiện hệ thống để đảm bảo rằng bạn có thể xem trực tiếp các trận đấu yêu thích một cách thông suốt và thú vị nhất.
Kênh đảm bảo đường truyền kênh với chất lượng nét căng và mượt mà. Chúng tôi đã đầu tư vào công nghệ tiên tiến và hệ thống máy chủ mạnh mẽ để đảm bảo rằng người dùng sẽ có trải nghiệm xem bóng đá trực tuyến tốt nhất.
Xem bóng đá trực tuyến Full HD+ và không mất phí
Socolive đáp ứng nhu cầu của người dùng bằng cách cung cấp dịch vụ xem bóng đá trực tuyến với chất lượng Full HD+ và hoàn toàn miễn phí. Bạn có thể tận hưởng những trận đấu hấp dẫn với độ phân giải cao, mang đến trải nghiệm sống động và sắc nét.
Với Socolive, bạn không cần phải trả bất kỳ khoản phí nào để xem bóng đá trực tuyến. Chúng tôi tin rằng mọi người đều có quyền tiếp cận và thưởng thức những trận đấu quan trọng mà không phải lo lắng về chi phí.
Kênh có nhiều lớp bảo mật an toàn
Socolive luôn đặt lên hàng đầu sự an toàn và bảo mật thông tin của người dùng. Chúng tôi đã triển khai nhiều lớp bảo mật để đảm bảo rằng dữ liệu cá nhân và thông tin quan trọng của bạn được bảo vệ một cách an toàn nhất.
Với các lớp bảo mật an toàn này, Socolive đảm bảo rằng bạn có thể tận hưởng trải nghiệm xem bóng đá trực tuyến mà không phải lo lắng về sự an toàn và bảo mật của thông tin cá nhân của mình.
Quy trình đăng ký tài khoản Socolivesocolive.biocá nhân thuận tiện và nhanh chóng
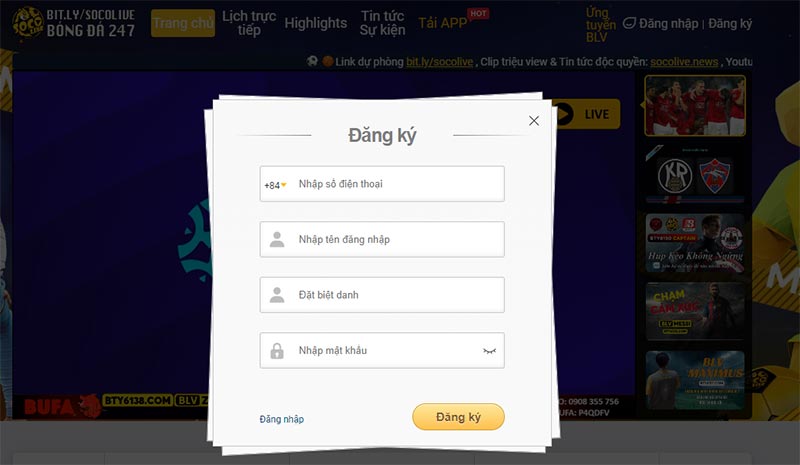
Socolive cung cấp quy trình đăng ký tài khoản cá nhân thuận tiện và nhanh chóng để bạn có thể truy cập và tận hưởng các dịch vụ một cách dễ dàng. Các bước đăng ký được mô tả cố định, dễ hiểu, dễ thao tác.
Socolive là kênh trực tiếp bóng đá có bình luận viên dí dỏm, chuyên nghiệp
Chúng tôi hiểu rằng bình luận viên có vai trò quan trọng trong việc làm sống động và thú vị trận đấu. Socolive mang đến cho người xem trải nghiệm xem bóng đá đặc biệt với bình luận viên dí dỏm và chuyên nghiệp.
Bình luận viên trên Socolive được chọn lựa kỹ càng, đảm bảo có kiến thức sâu rộng về bóng đá và khả năng truyền đạt thông tin một cách chuyên nghiệp. Họ không chỉ cung cấp những phân tích chi tiết về trận đấu, mà còn mang đến những câu chuyện, thông tin thú vị và những lời bình luận hài hước để làm cho trận đấu trở nên thú vị hơn.
Có Blog bình luận trao đổi rộng rãi trong cộng đồng mê thể thao
Kênh cung cấp một blog bình luận và trao đổi rộng rãi trong cộng đồng mê thể thao, nơi bạn có thể đọc và tham gia vào các bài viết, thảo luận và chia sẻ ý kiến với những người hâm mộ thể thao khác. Blog của kênh tập trung vào các chủ đề liên quan đến bóng đá và thể thao nói chung.
Trên blog, bạn có thể tìm thấy các bài viết về các trận đấu, nhận định về các đội bóng, phân tích chi tiết về các sự kiện thể thao, tin tức nóng hổi và nhiều nội dung thú vị khác. Bạn cũng có thể đăng bài và chia sẻ ý kiến của mình với cộng đồng người hâm mộ, tạo ra các cuộc thảo luận và trao đổi ý kiến sôi nổi.
Socolive hạn chế quảng cáo chèn vào khi xem trực tiếp bóng đá
Socolive hiểu rằng trải nghiệm xem trực tiếp bóng đá của người dùng là quan trọng, và chúng tôi cố gắng hạn chế sự xâm nhập của quảng cáo chèn trong các live bóng đá.
Tuy nhiên đôi khi một số quảng cáo có thể xuất hiện vì chúng đóng vai trò quan trọng trong việc hỗ trợ hoạt động và duy trì sự phát triển của dịch vụ nên chúng tôi cũng mong người xem có thể thông cảm cho đội ngũ lập trình của kênh nhé.
Kênh Socolivesocolive.biocung cấp những tính năng chính nào?
Socolive là kênh về bóng đá vô cùng nhiều tính năng, các tính năng giúp người truy cập thoải mái lựa chọn tin tức yêu thích dễ dàng. Một số tính năng được ghim trên menu gồm:
Mục tin tức bóng đá mới nhất
Chuyên mục này cung cấp những tin tức mới nhất về các trận đấu, sự kiện, thông tin chuyển nhượng, tin tức câu lạc bộ và đội tuyển bóng đá. Đội ngũ biên tập viên của Socolive tận dụng các nguồn tin đáng tin đảm bảo cung cấp thông tin chính xác.
Live trực tiếp giải đấu bóng đá lớn
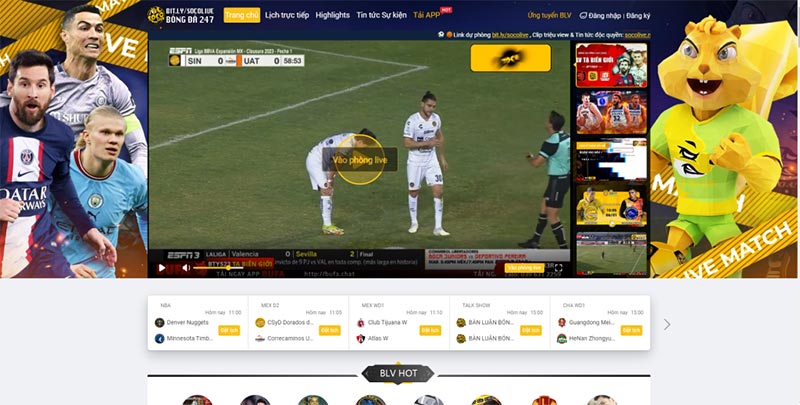
Chuyên mục cung cấp dịch vụ live trực tiếp các giải đấu bóng đá lớn trên thế giới mỗi ngày, lịch thi đấu bóng đá. Kênh đảm bảo mang đến cho người dùng những trận đấu hấp dẫn và chất lượng cao nhất có thể.
Xem lịch sử các pha highlight bóng đá
Chuyên mục này là một phần của trang và được thiết kế để cung cấp cho người xem các pha highlight. Ở đây tổng hợp các pha highlight bóng đá đáng chú ý từ các trận đấu, giải đấu và sự kiện quan trọng trong lịch sử bóng đá. Người dùng có thể tìm thấy các pha bóng đẹp, bàn thắng, tình huống nổi bật, kỹ thuật xuất sắc và những khoảnh khắc đáng nhớ từ các trận đấu ở khắp nơi trên thế giới.
Xem lịch thi đấu giải bóng đá đầy đủ
Chuyên mục này cung cấp lịch thi đấu của các giải đấu quốc tế lớn như FIFA World Cup, UEFA Champions League, EURO, Copa America,… Người dùng có thể tìm thấy thông tin về các trận đấu, lịch trình, địa điểm tổ chức vô cùng chi tiết mà không mất nhiều thời gian.
Cập nhật bảng xếp hạng các đội bóng mới nhất mỗi ngày
Chuyên mục này tại Socolive giúp bạn xem vị trí của các đội bóng trong bảng xếp hạng, điểm số, số trận thắng, hòa, thua,… chi tiết. Ngoài ra mục này cũng cung cấp bảng xếp hạng mới nhất của các câu lạc bộ bóng đá hàng đầu trên thế giới. Người dùng có thể xem vị trí của các câu lạc bộ như bảng xếp hạng seagame 32, Barcelona, Real Madrid, Manchester United, Liverpool, Juventus,…
Cập nhật tỉ số trận đấu nhanh
Chuyên mục ở Socolive này cung cấp thông tin về tỉ số của các trận đấu đang diễn ra hoặc đã kết thúc một cách nhanh chóng và liên tục. Người dùng có thể xem tỉ số cụ thể của các trận đấu, số bàn thắng, thời gian,…
Cung cấp tỷ lệ kèo cược đầy hấp dẫn
Chuyên mục tỷ lệ kèo cược là một phần quan trọng của kênh Socolive. Chuyên mục này cung cấp tỷ lệ kèo cược cho các sự kiện thể thao, chủ yếu là bóng đá. Tỷ lệ kèo cược cho mỗi trận đấu sẽ được hiển thị, bao gồm các loại cược khác nhau như cược châu Á, cược châu Âu, cược số điểm, cược tỷ số và nhiều loại cược khác. Tỷ lệ kèo cược cung cấp thông tin về cách cá cược được định giá cho từng sự kiện thể thao.
Socolivesocolive.biocung cấp link xem bóng đá mới nhất

Kênh Socolive cũng cung cấp link xem bóng đá các trận cầu mới nhất với độ phân giải cao. Cụ thể:
Link xem bóng đá trực tiếp tại kênh Socolivesocolive.bio
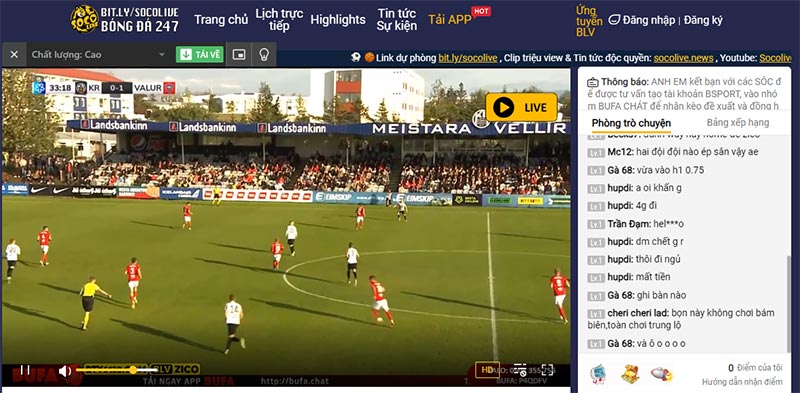
Link xem các trận bóng trực tiếp được kênh cập nhật liên tục. Nền tảng cung cấp cho người xem tới 4 đường link gồm cả link chính và link dự phòng để không làm gián đoạn quá trình xem bóng đá.
Khoảng 30 phút trước trận đấu bóng đá, link xem trực tiếp sẽ được gửi tới người xem. Link cung cấp đều miễn phí và ai cũng có thể xem và chia sẻ công khai được.
Bộ link dự phòng của kênh tructiepbongda Socolivesocolive.bio
Nếu bạn gặp khó khăn trong việc tìm kiếm link xem bóng đá trực tiếp thì có thể tìm link dự phòng ở các kênh: Socolive tv, Socolive link, Socolive com, Socolive vn, Socolive net, Socolive live.
Các bước xem trực tiếp bóng đá Socolivesocolive.bio
Kênh Socolive cung cấp đa dạng các trận bóng live mỗi ngày. Để xem trực tiếp bóng đá trên kênh Socolive, bạn có thể tuân theo các bước sau:
- Bước 1: Mở trình duyệt web trên thiết bị của bạn và truy cập vào Socolive. Đảm bảo bạn có kết nối internet ổn định để có trải nghiệm xem bóng đá mượt mà.
- Bước 2: Trên trang web Socolive, tìm kiếm trận đấu bóng đá mà bạn muốn xem. Sử dụng chức năng tìm kiếm hoặc vào chuyên mục lịch thi đấu để tìm trận đấu mong muốn.
- Bước 3: Bấm vào nút “Xem trực tiếp” bắt đầu thưởng thức nếu trận đấu đã bắt đầu.
Cách tải app tructiepbongda Socolive miễn phí trên điện thoại
Để tải ứng dụng Socolive và xem miễn phí trực tiếp bóng đá trên điện thoại, bạn hãy làm theo các bước được chúng tôi mô tả ở dưới đây:
- Bước 1: Vào website Socolive chính thức.
- Bước 2: Bấm vào tải App ngay trên trang chủ của kênh. Chọn mã QR thích hợp với hệ điều hành bạn đang dùng.
- Bước 3: Đợi ứng dụng bắt đầu quá trình tải xuống và cài đặt vào điện thoại thành công là được.
Khi xem bóng đá trực tiếp Socolivesocolive.biocần chú ý những gì?
Khi xem bóng đá trực tiếp trên Socolive có một số điều quan trọng mà bạn cần chú ý. Dưới đây là các chú ý quan trọng nhất bạn bắt buộc phải kiểm tra:
- Kiểm tra và đảm bảo bạn có một kết nối internet ổn định và nhanh để tránh giật lag hoặc mất kết nối trong quá trình xem trực tiếp.
- Kiểm tra lịch trình trận đấu và ngày diễn ra các trận đấu giúp bạn sắp xếp thời gian và không bỏ lỡ các trận đấu quan trọng.
- Kiểm tra xem Socolive hỗ trợ độ phân giải nào và chất lượng video tốt nhất. Hãy chọn độ phân giải và chất lượng phù hợp với tốc độ kết nối internet của bạn để có trải nghiệm xem tốt nhất.
- Bạn có thể tham gia bình luận, đánh giá trận đấu hoặc thảo luận với cộng đồng người xem để việc coi bóng đá trở nên thú vị hơn.
Lý do kênh Socolive được người xem đánh giá cao?
Trên không gian mạng hiện nay có không ít kênh trực tiếp bóng đá đang cạnh tranh, Socolive sở hữu nhiều ưu điểm được người dùng đánh giá cao. Cụ thể:
Ưu điểm của kênh tructiepbongda Socolivesocolive.bio
- Socolive cung cấp trải nghiệm xem bóng đá trực tiếp với chất lượng hình ảnh và âm thanh tốt.
- Kênh cung cấp thông tin chính xác và tin cậy về các trận đấu, đội bóng, cầu thủ và sự kiện trong làng bóng đá.
- Đội ngũ bình luận viên là những chuyên gia giàu kinh nghiệm, bạn có thể tin tưởng vào thông tin được cung cấp trên Socolive.
- Ứng dụng Socolive có giao diện trực quan và dễ sử dụng trên các thiết bị di động.
- Đa dạng các tính năng bổ sung như xem lại các trận đấu đã diễn ra, xem lại các bàn thắng và tình huống hấp dẫn, thông tin thống kê, xếp hạng và lịch thi đấu.
Nhược điểm của kênh tructiepbongda Socolive
Socolive vẫn còn một số nhược điểm cần khắc phục. Không có quảng cáo trên kênh này, nhưng để duy trì miễn phí, chúng tôi cần sự hỗ trợ từ các nhãn hàng hoặc thương hiệu. Điều này có nghĩa là quảng cáo là cách tốt nhất để kênh phát triển, và chúng tôi hy vọng người xem thông cảm.
Ngoài ra, trong một số trận đấu bóng đá có thể Socolive chưa có bình luận viên tương tác cùng người xem. Điều này có nghĩa là một số trận đấu của đội tuyển yêu thích của bạn có thể thiếu người bình luận. Chúng tôi vẫn đang nỗ lực cải thiện nhược điểm này.
FAQs về bóng đá trực tuyến tại kênh tructiepbongda Socolivesocolive.bio
Có nhiều câu hỏi được đặt ra đối với kênh Socolive. Một số câu hỏi mà đội ngũ CSKH nhận được nhiều nhất là:
Kênh có cụ thể những tính năng gì?
Có nhiều tính năng được ghim trên menu gồm có: xem trực tiếp bóng đá Socolive, cập nhật thông tin về kết quả, video highlight, bảng xếp hạng, lịch thi đấu…
Trận bóng giữa Fulham vs Manchester xem tại kênh có không?
Đừng lo, Socolive cung cấp rất nhiều trận bóng đá lớn nhỏ, live liên tục. Bạn muốn xem trận bóng giữa Fulham vs Manchester là điều quá đơn giản.
Sự kiện của kênh Socolive thường có những gì?
Kênh Socolive vẫn đang liên tục tuyển bình luận viên bóng đá. Nếu bạn cảm thấy bản thân có đủ các tiêu chí đừng ngần ngại tham gia nhé.
Clip highlight bóng đá Socolive xem lại ở đâu?
Trong chuyên mục highlight có rất đầy đủ, nếu bạn muốn xem lại thì có thể vào đây để tìm kiếm những pha kiến tạo hoặc bàn thắng đẹp mắt.
Xem trực tiếp bóng đá ở Socolivesocolive.biođợi bao lâu thì có link?
Các link live bóng đá thường được cung cấp cho người xem trước khi trận đấu diễn ra khoảng 30 phút đồng hồ.
Kết luận
Tóm lại, Socolive là một nền tảng xem bóng đá, đọc tin tức về bóng đá uy tín hàng đầu. Kênh cung cấp cho người xem trải nghiệm xem bóng đá trực tuyến chất lượng cao và đa dạng các tính năng hữu ích khác. Với Socolive, bạn sẽ không bỏ lỡ bất kỳ trận đấu hay thông tin quan trọng nào trong thế giới bóng đá.